Saturday, 27 February 2010
Use of a Light meter
Why Use A Light Meter
For general, standard photography such as quick snaps of the kids, a day at the beach, and even sports photography, a light meter would be difficult to use because of the high speed pace, there wouldn’t be much time to meter before taking a shot. You’ll end up missing more shots than it’s worth.
So where do light meters shine? Portraits, mainly. We at Bui Photography shoot a lot of our portraits outdoors and with flash strobes off-camera. Because of that, it’s far easier to photograph in the Manual mode exposure because we know exactly the look and feel of what we want to achieve whereas our camera doesn’t. In case I’ve lost you, unless your camera is broken in Manual mode, there is no auto exposure metering because you have to set the shutter and aperture yourself.
So how do figure out what shutter and aperture to use in relation to the power of flash and ambient lighting? What if you want more flash power than ambient? What if you want to balance ambient and flash? Unless you can meter the scene with your eyes and translate it to a f-stop and shutter speed values, you’ll have to do what many people do: guess and chimp. By guessing, you would set your shutter speed to your max sync speed (1/250 on a HYPERLINK "http://www.bhphotovideo.com/c/product/518204-REG/Canon_2011B002_EOS_1Ds_Mark_III_SLR.html/BI/2448/KBID/3281" Canon EOS 1Ds Mark III, 1/200 on a HYPERLINK "http://www.bhphotovideo.com/c/product/583987-REG/Canon_2764B004_EOS_5D_Mark_II.html/BI/2448/KBID/3281" Canon EOS 5D Mark II) and set your flash power to half or quarter power for faster recycle times and guess an aperture of f/5.6 or something and take a shot. Then you review on your LCD to see if it looks good or not. Repeat and make the changes as necessary. Terribly inefficient wouldn’t you agree? And even if you think you nailed the exposure, wait until you extract those images on your computer, you’ll find you were still off. Look how much time you are wasting on the technical aspect in setup and post processing! I don’t know about you, but I rather be spending time being creative. Also keep in mind, unless you are using one the new fancy cameras with their high resolution (920,000 pixels) LCD screens, the LCD screens on your camera are not good tools to judge color or exposure because it’s not accurate! You can use the brightness histogram which will be a bit more accurate, but in certain lighting conditions, it won’t help you much.
This is where the light meter comes in to ensure that you don’t just have good exposure or close to perfect exposure, but perfect exposure. After you’ve properly calibrated and learned to use a light meter, you’ll find that you’ll trust the values from your light meter more than what you see on your camera’s LCD. When I use the light meter, I put my model where I want her to be, put a strobe based on how I want to light her, pull out my meter and set it to my max sync speed and ISO and do a test pop and it tells me the exact aperture and how much flash power versus ambient. I can either bring my light source closer to the subject or dial up the flash power to get less ambient lighting or lower my flash power for more ambient lighting. Set those values in camera and start the creative process!
By getting perfect exposure and HYPERLINK "http://blog.buiphotography.com/2009/05/white-balance-woes-in-the-workflow/" setting custom white balance, everything is properly exposed and the colors just pop. Not only that, when I extract the images, instead of wasting time correcting color and white balance issues, I’m spending time selecting keepers and cropping.
You’re probably wondering why a light meter is more accurate than the camera’s built-in exposure meter, the answer is simple. The camera’s built-in meter works off reflective metering which functions with the camera metering light reflecting off the subject. This works well for the most part, but in situations where lighting is all over the place, the camera can be tricked and meters off the brightest part and under-exposes the entire scene. In a case of a forest with some light beams coming through, the camera might be confused with the light beams and try to expose for it which would make the entire scene under-exposed. With a light meter, usually used as an incident meter (you can get light meters that are incident meters with reflective meters built in) which measures light directly as it would fall on the subject and gives you a very accurate metering of the scene. In addition, you can move the light meter to meter multiple sources an average all the readings for a proper exposure. An example would be a portrait shot where you have your key light, hair light, and fill light. Each of the light sources are pointing in various directions and with a light meter you can read the output of each light.
Light meters also work extremely well for ambient metering for the very same reason. Even if you’re not using strobes and shooting only with ambient lighting, you can meter your subject and dial in a precise aperture/shutter values to get perfect exposure.
Which Light Meter Should I Buy?
For the most part, any light meter will work plenty fine. I personally use a HYPERLINK "http://www.bhphotovideo.com/c/product/221078-REG/Sekonic_401_358_L_358_Flash_Master_Meter.html/BI/2448/KBID/3281" Sekonic L-358 with HYPERLINK "http://www.bhphotovideo.com/c/product/221079-REG/Sekonic_401_621_Digital_Radio_Transmitter_Module.html/BI/2448/KBID/3281" RT-32 remote trigger module because we are heavily invested in the PocketWizard system and the L-358 lets us remotely trigger the strobes when we press the measure button. If you don’t use PocketWizard, but some other wireless trigger technology, you could still use the L-358 and just not buy the optional remote trigger module and trigger the strobes manually. The second biggest reason I like the L-358 is because it tells you how much flash power is being used versus ambient. This is a real plus because you don’t have to guess at values if you want more ambient than flash or more flash than ambient; a very powerful tool that I use very often.
One of our other staff photographers uses a HYPERLINK "http://www.bhphotovideo.com/c/product/361574-REG/Gossen_GO_4033_Digipro_F_Flash.html/BI/2448/KBID/3281" Gossen DigiPro F and likes it for it’s slim profile and no-nonsense use. You can’t really go wrong with either Sekonic or Gossen. It really comes down to what your needs are and which light meter offers what you need.
Conclusion
Getting perfect exposure doesn’t have to be difficult or pain-staking. It doesn’t have to even be done in Photoshop or Lightroom. It’s much faster and less destructive to get the exposure at the time you take the image as opposed to fixing it later. One of the best investments in this area is a light meter, whether it is a Sekonic or Gossen, you don’t need a $600 light meter. The entry level Sekonic or Gossen do more than plenty for many people and saves you time and saves your sanity, it more than pays for itself. Be on a look out for how to use a light meter
Lesson learnt
After using the light meter for the studio shots, I have taken these readings as a starting point to achieve the effects that I want to create. After listening to Mr Steve's advice and watching how the reading s are used and interpreted, there should be no excuse for not getting the image that I wish to project.
Mr Steve's Crit
Mr Steve had a look at my studio portraits of Brent and offered some advice. Some were very good, and some needed a boost from Photoshop. I had a variety of different light levels, but I would like to settle on one type for this course.The crit was very useful and informative. Yippee ! The essence of a portrait is in the photographer deciding where he would like the focus on the subject to. One comment made by my sitter was that I did not say enough, so I have to improve this, I was OK in the direction though. Today I have assisted Ruth by noting the location of the lighting and subject, and doing the same with Steve, learning a lot in the process, observation is also very informative. Mr Steve also referred to the use of body lanquage to capture the essence of the sitter.
I am attempting to emulate the photographers styles that I like, and I am progressing in that vein.
We were encouraged to use the class Blog that Mr Steve has set up, so that he can comment on our work and we can ask questions.
Thursday, 25 February 2010
Carnaby Street London
|  |
|
Tuesday, 23 February 2010
Glassware
I have borrowed some glassware and this is my first attempt at getting some sort of image. The surface is highly reflective, and picks up the reflection of any light source. It is a beautiful piece of work, and I would like to get a decent image. I have tried to clothe it in a black background, that did not stop the reflections, and placing a black card over the top did reduce the reflections off the ceiling. I was using the lights to light the glassware but I was still getting loads of reflections. Any ideas?????
 natural ceiling light
 same again from on top
 with black background and direct flash and reflection off walls and ceilings
 different view with flash
 this shows reflection from walls amd ceiling
 just a close up same lighting

 natural light so many reflections
 natural ceiling light
 same again from on top
 with black background and direct flash and reflection off walls and ceilings
 different view with flash
 this shows reflection from walls amd ceiling
 just a close up same lighting

 natural light so many reflections
Bowens Lighting Kit
L3
This is the kit I have used at home, borrowed from College, to take the "producture" shots included elsewhere in this blog. I have also used these ligths to create some of my portraits at home in my lounge.
The biggest concern when usin gthese light was the safety issue. I had to tell other members of the house not to come into the lounge and dining area as there would be cables trailing over the floor (as tidy as I could get). I had set the lights up in a sensible way though so as not to cause any trip hazards (see note book). I also leanrt how to set up my laptop so that the cables were away from the working side. I also let the model know the whereabouts of the cables etc. Also the backdrop at home was only pegged to the curtains so I had to let the model know where to stand and informed them of the psoosiblities of it all falling down if they stepped back to far. No one did, they did listen. it was just a shame there was no snoot with the kit. I found the kit to be excellent.

The Bowens Esprit Gemini Lighting Kit includes:-
2 x Bowens Esprit Gemini 500W head
2 x Bowens 92 mm Umbrella
2 x compact lighting stands
1 x deluxe Kit bag
The power cords, sync leads and modelling lamps, and also included a battery pack.
The dual purpose silver/white umbrellas feature a white interior surface backed by a removable silver fabric with a black backing which provides a soft, but highly efficient bounced light source. For close-up lighting, the silver black backing can be removed, allowing the photographer to get closer to the subject while lighting through the umbrella. Unique ten-panel design provides maximum reflectance with a circular light pattern.
I found this kit very easy and simple to use, and set to up at home. The power level was also very good and I found there was a good range to suit my potential images. Once I had tried a few images I was able to adjust the lighting to get to where I wanted it to be. Missing however was the ability to use a snoot and softbox, which were not provided with this kit and unable to borrow from college. I feel I could have used these to good effect. However, I am pleased with the results with the kit provided.
Of course the other consideration was not to overload the circuits at home, but by spreading the load over several sockets I had no problem.
I did prefer this kit to another kit that I could borrow, a 150W 2 light system, but I found that although it was very good, it was not as flexible as the kit borrowed from college, ie the 500W lamps.
The major consideration with use of this kit however was to ensure that the cables were not in the area's were trip hazards could be. This took some thought and I had to trail the cables to the one side away from the area of passage as much as possible. Using one light was not too difficult to adjust too, and informing the model as well as to the location of the cables. The other consideration I had to take into account is that I was using my Laptop tethered to my Camera, which necessitated a 5m lead, and of course the power lead.It was extremely good to use the laptop, as the model could then use the images taken to adjust the pose as directed easier than without, as they could also see the images as taken. It is also so much better to see for myself as well on a larger screen, alot easier to make adjustments.
When using the lighting kit I also use my light meter. It is a Sekonic 358 and gives a very good guide to the level of exposure required. Once set it is possible to take several images without changing the settings until the psoe changes, when a new reading is taken.
Guardian.co.uk
Hey Guys and Girls
Check out this website, it has a lot of photographic stuff contained within it. I have seen it before, but there seems to be a lot more on there at the moment. It also has a video of Prince William/Rankin and Jeff Hubbard on it showing their shoot day for the CRISIS charity. Just goes to show how easy photography is!!!!!!
See - Guardian.co.uk
Sunday, 21 February 2010
Irving Penn Notes
Irving Penn Biography (1917 - )
American photographer noted for his sophisticated fashion images and incisive portraits.
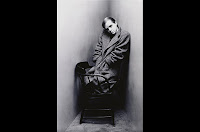
On our (L3 photography group) day trip to London 20th February 2010, some of us visited the National Portrait Gallery, and the Irving Penn exhibition. Personally, I learnt a lot from looking at his photographs, and had quite a difficulty working out how he had lit some of his images. I know that he used a large bank of lights in his studio for some shots, but I still could not work out how he has lit some of his images, especially the ones where the subject is posed in front of the tall stage flats together to create a narrow corner in which to photograph his subjects. Penn invented this particular backdrop, which became known as the corner.
Once again this photographer started life as a painter, and then progressed to photography, and along the way just happened to pass the time with the likes of Giorgio de Chirico, Le Corbusier, Marcel Duchamp, Martha Graham, Georgia O’Keeffe, Edward Steichen, Jean Cocteau, Joan Miró, Cecil Beaton, Pablo Picasso, Yves Saint Laurent, Susan Sontag, Ingmar Berman, André Kertesz, Richard Avedon, Helmut Newton, basically so many of the many cultural figures it is difficult to work out who he did not photograph. What influence these artists and photographers would have had on each other would have been so wonderful, to live such a rich artistic life. But they all managed to develop the own style, all managed to get published with the art and fashion magazines of the day.
Penn established himself as a fashion photographer and got published in the likes of Vogue, with his own ideas for covers. Penn relied on the manner, attitude and tolerance to represent a subject, and all his images were meticulously set up and photographed to the greatest detail. The subjects must have had a lot of patience to sit there while he set himself up. But this is the skill and importance of the photographer, and the most important part of taking portraits, and being able to judge the sitters personality whilst in front of the camera. I like the bold and contrasting lighting that he uses, but he manages to show every detail in his images. His subjects are placed against a bare backdrop, and the subtlety of this shows also through in his subjects.
I also find it incredible that in his early days he had no control over the images produced, as they were by the magazine. He sometimes did not see his image until it had been published. Did these images match that idea he had in his head when photographing them?
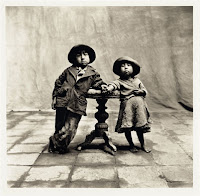
He also travelled quite extensively. He went to Peru in the late Forties for example, where he would employ the same techniques in photographing the local people as he did when in a studio. This allowed him to create and isolate the cultural differences for all to see without any distracting backgrounds. He developed his own portable background, similar to the ones we use today.
Writing about Penn's work for an exhibition at the Museum of Modern Art, the museum's then-Chief Curator of Photography, John Szarkowski wrote, "The grace, wit, and inventiveness of Penn's pattern-making, the lively and surprising elegance of his line, and his sensitivity to the character, the idiosyncratic humours, of light make Penn's pictures, even the slighter ones, a pleasure for our eyes.
What I find most interesting in these images is the consistency. The fact that his technique has been developed from his painting and advertising days is evident, as his technique is so different to his peers. From his portraits, through to his travel portraits and nudes, he has managed to get the personality of his sitter captured. His handling of the backgrounds is very simple and very effective. This is the area that I have concentrated on for this excercise.
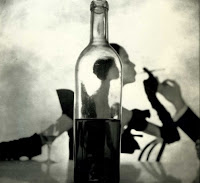
 smoking black and white conceptual
  Richard Avedon
 Jacob and Gwen Lawrence
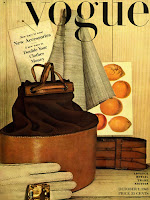
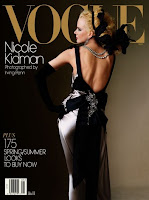
 1St cover 1943
  Vogue 54 Nicole Kidman
  Peruvian disaffected Children
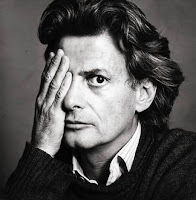
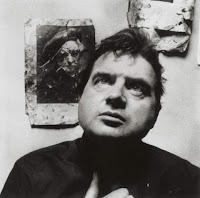
  Francis Bacon
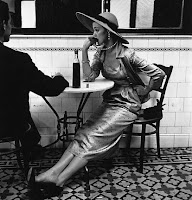
  Cafe in Lima (how many times do I see a similar image whilst out)
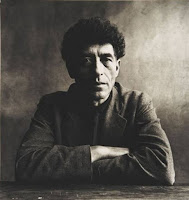
  Alberto Giacometti Paris 1950
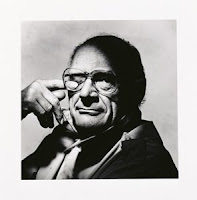
  Arthur Miller
  Trumen Capote
  Simone de Beauvoir 1957
  Pablo Piccasso
  Marcel Duchamp
 Mud men
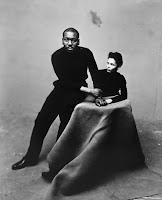
  Lisa Fonssagrives-Penn 1950
  Vogue cover 1950
  Guedras in the wind 1971 Morocco
Producture images
L3
L3
What I find most interesting in these images is the consistency. The fact that his technique has been developed from his painting and advertising days is evident, as his technique is so different to his peers. From his portraits, through to his travel portraits and nudes, he has managed to get the personality of his sitter captured. His handling of the backgrounds is very simple and very effective. This is the area that I have concentrated on for this excercise.
 smoking black and white conceptual
 Richard Avedon

 Jacob and Gwen Lawrence

 1St cover 1943
 Vogue 54 Nicole Kidman
 Peruvian disaffected Children
 Francis Bacon
 Cafe in Lima (how many times do I see a similar image whilst out)
 Alberto Giacometti Paris 1950
 Arthur Miller
 Trumen Capote
 Simone de Beauvoir 1957
 Pablo Piccasso
 Marcel Duchamp
 Mud men
 Lisa Fonssagrives-Penn 1950
  Vogue cover 1950
 Guedras in the wind 1971 MoroccoBefore the party, but tried to use a theme of advertising the shoes.
 I'm looking for somebody to model the shoes, size 4? Does anybody know who has feet this size? mine are too big! ISO 100 - f8 - 1/160 - 55 mm lens
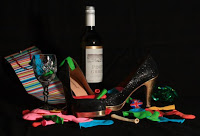 This was using only one light from 45 degrees from the right. ISO 100 - f32 - 1/60 - 45 mm lens - manual setting - light meter reading adjusted down. Can you see the name?
Do you like my new word description?
This was using only one light from 45 degrees from the right. ISO 100 - f32 - 1/60 - 45 mm lens - manual setting - light meter reading adjusted down. Can you see the name?
Do you like my new word description?
smoking black and white conceptual
Richard Avedon
Jacob and Gwen Lawrence
1St cover 1943
Vogue 54 Nicole Kidman
Peruvian disaffected Children
Francis Bacon
Cafe in Lima (how many times do I see a similar image whilst out)
Alberto Giacometti Paris 1950
Arthur Miller
Trumen Capote
Simone de Beauvoir 1957
Pablo Piccasso
Marcel Duchamp Mud men
Lisa Fonssagrives-Penn 1950 Vogue cover 1950
Guedras in the wind 1971 Morocco I'm looking for somebody to model the shoes, size 4? Does anybody know who has feet this size? mine are too big! ISO 100 - f8 - 1/160 - 55 mm lens
 This was using only one light from 45 degrees from the right. ISO 100 - f32 - 1/60 - 45 mm lens - manual setting - light meter reading adjusted down. Can you see the name?
Do you like my new word description?
This was using only one light from 45 degrees from the right. ISO 100 - f32 - 1/60 - 45 mm lens - manual setting - light meter reading adjusted down. Can you see the name?
Do you like my new word description?
Subscribe to:
Posts (Atom)
